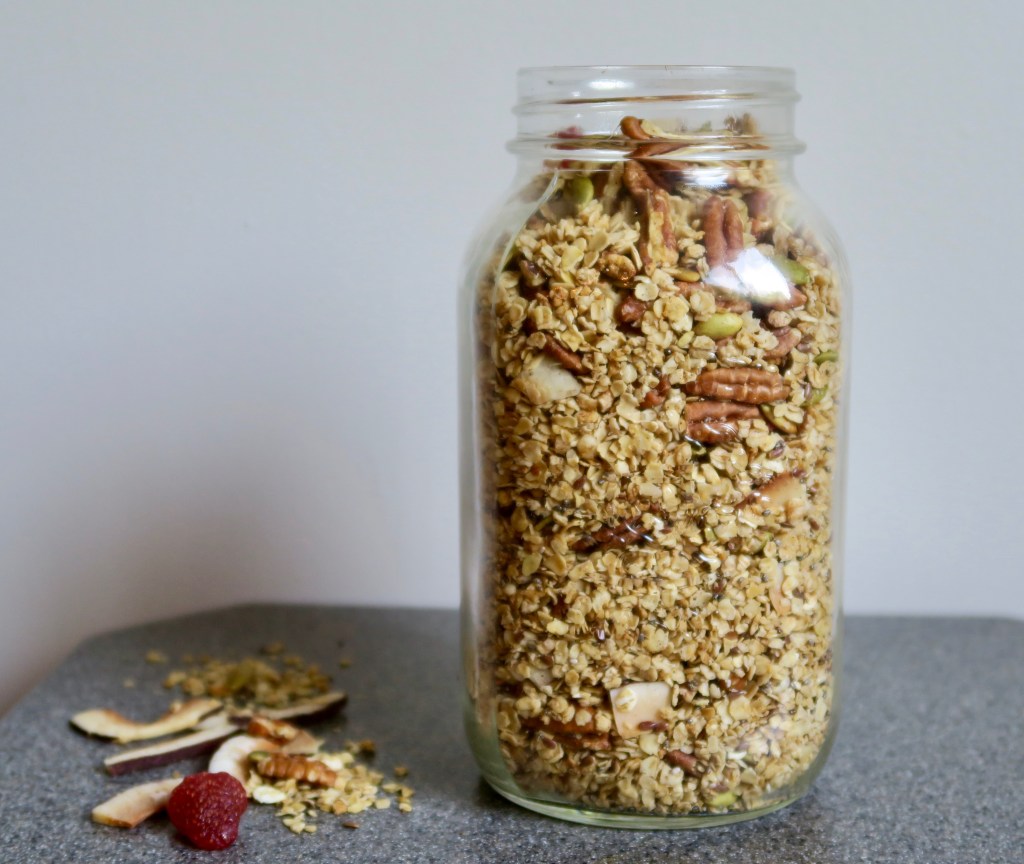
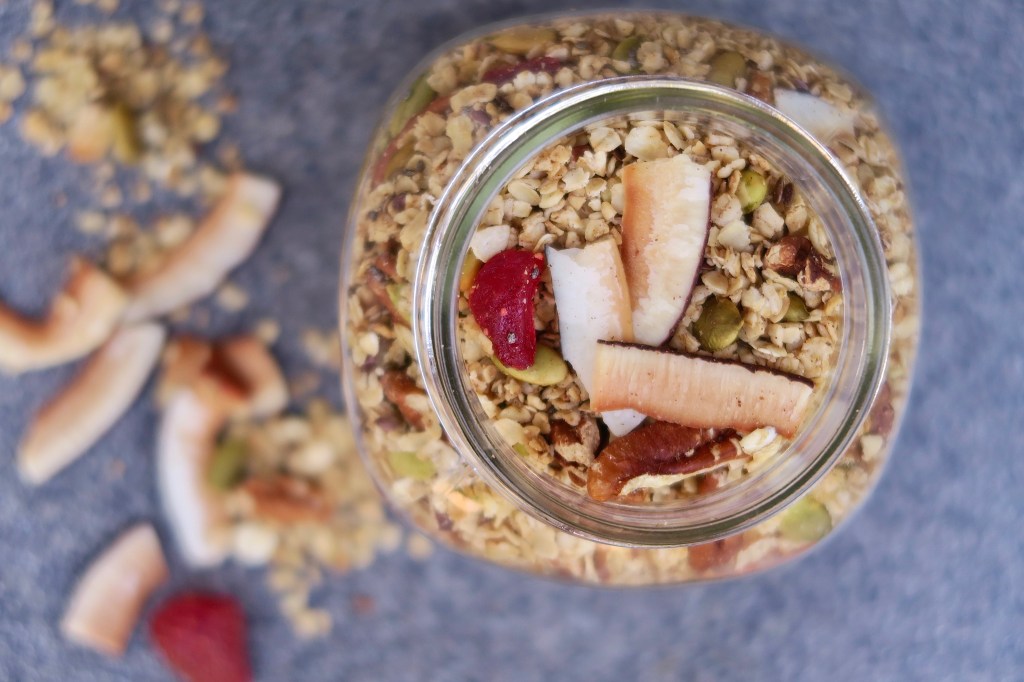
Granola is a quick and easy breakfast or snack that can be added to anything! I prefer to make my own granola rather than buying it not only because it is super easy to make, but also so I can switch up the flavours and choose ingredients that I am craving.
This recipe contains 9 different ingredient categories that you can switch up based on your personal preference and dietary needs. Below I included ingredients for my favourite granola batch.
INGREDIENTS:
OATS: 4 cups, toasted
HEALTHY FATS: 1/3 cup melted coconut oil
SWEETNER: 1/3 cup maple syrup
SEEDS: 3 tbsp pumpkin seeds (I often add chia seeds and flax seeds as well)
NUTS: 1 cup pecans (I also like adding walnuts or slivered almonds)
FLAVOUR BOOST: 1 1/2 teaspoon vanilla
DRIED FRUIT: 1/2 cup dehydrated strawberries (I also like coconut flakes, raisins, or apricots)
SPICE: 1 teaspoon cinnamon (I like all spice too)
SALT: 1/4 teaspoon salt
INSTRUCTIONS:
Line a large baking sheet with parchment paper and preheat oven to 350 degrees.
In a large mixing bowl, combine oats, seeds, nuts, spice and salt. Stir until thoroughly combined.
To the mixing bowl, add oil, liquid sweetener, and vanilla. Again, stir this mixture until well combined.
Pour granola mixture onto prepared baking sheet, spreading it out evenly using a large spoon.
Bake for 20-25 minutes or until golden brown, stirring granola halfway through cooking time. Remove granola from the oven and allow to cool completely (~ an hour).
Stir in the dried fruit (and any additional ingredients you would like to add in) and mix. Continue to mix until desired “clumpiness” of granola is reached.
Store the granola in a sealed container at room temperature for up to two weeks, or in the freezer for up to 4 months. Enjoy!
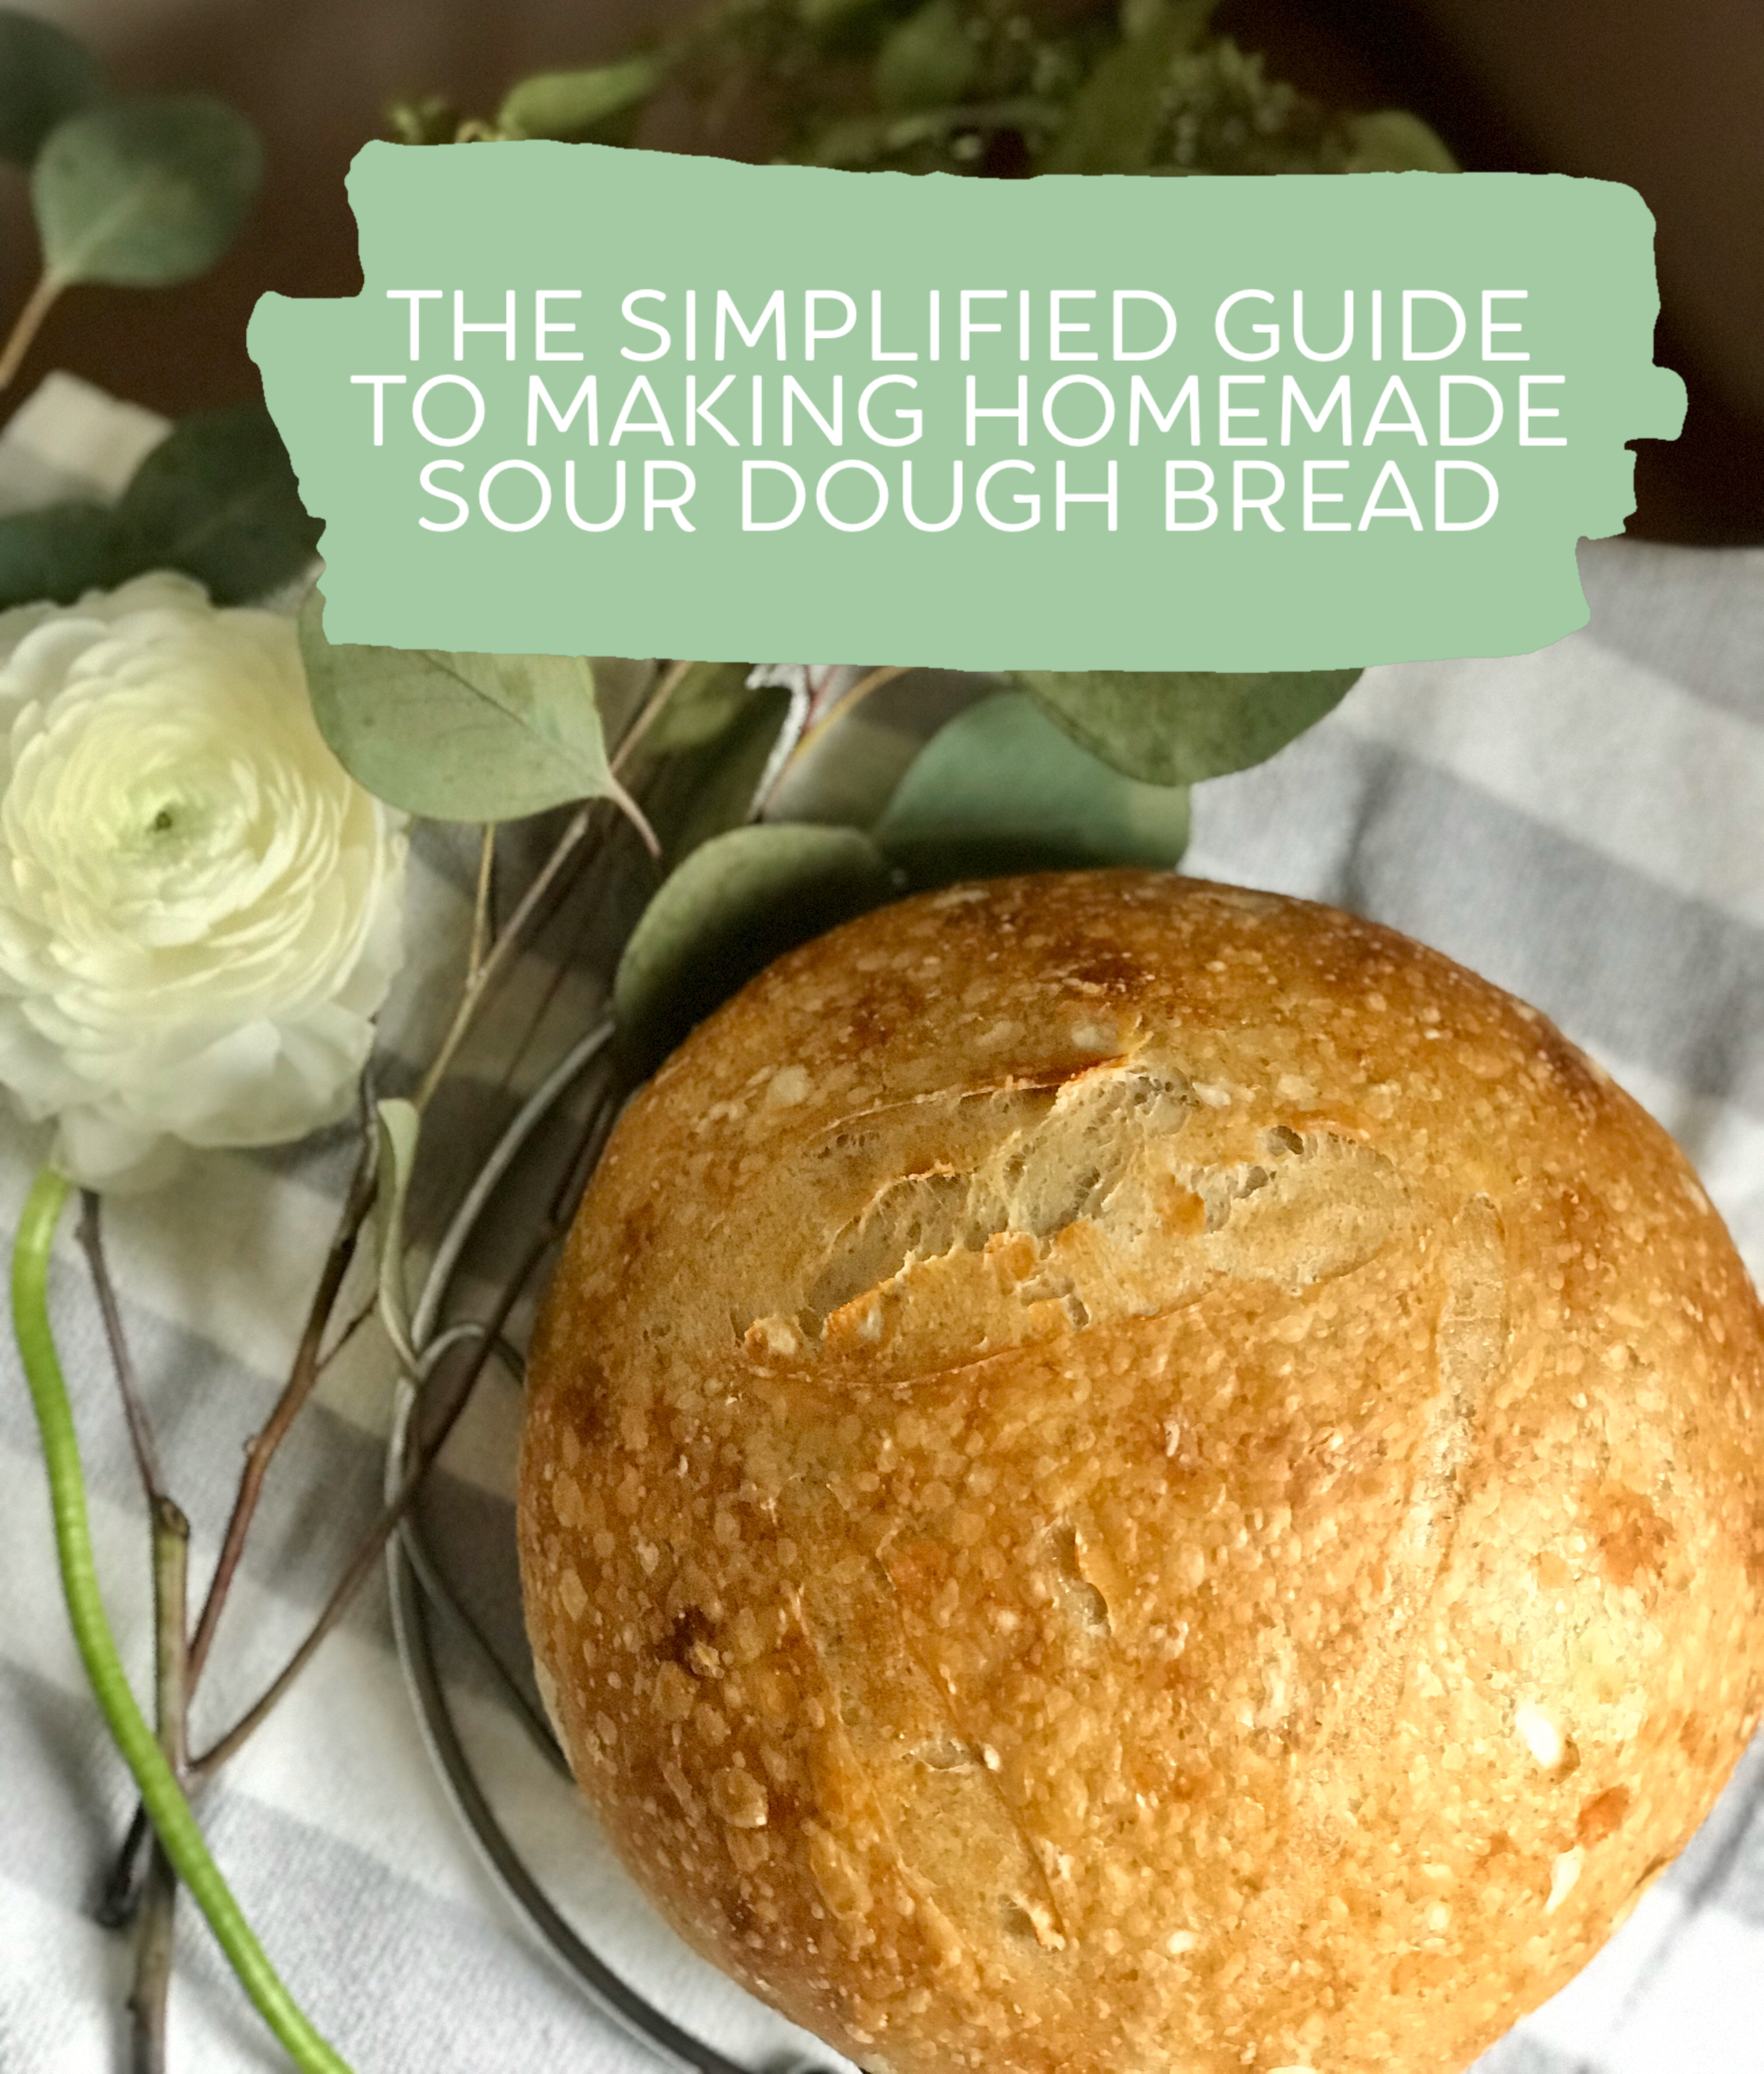
Making homemade sourdough bread takes a lot of time, accuracy, and consistency. During this time of social distancing/isolation is the perfect chance to learn how to make it! It took our household NUMEROUS attempts and many failed loaves to even partially master it.
Not only is sourdough bread super tasty, it has a very low glycemic index (GI). The GI is a relative ranking of carbohydrate containing food and drinks, and indicates the effect that these carbs have on ones blood glucose levels. Foods that contain a low GI help to keep blood sugar levels steady, avoiding spikes. This helps to prevent insulin resistance and the potential development of diabetes.
The long fermentation process gives sour dough bread its distinct taste. During the fermentation process, digestive enzymes and protein function is enhanced, making it easier on the digestive system for those who are intolerant or sensitive to gluten.
Although the process is quite lengthly (~10 days – but can take as long as 2 weeks for the starter to become active), the taste of the bread will be worth it! It’s important to be precise when feeding the starter. Don’t be discouraged if your first few (or 12) loaves don’t turn out as well as you had hoped! Follow the instructions below for the simplified guide to making homemade sour dough bread.
What you’ll need:
2, 1 litre sterile glass canning jars
whole wheat flour
1, 2 litre bottles of distilled water – unfortunately there is no way to avoid using bottled water as the water must be distilled and free from all minerals
digital kitchen scale
cloth (jay, cheese)
First, you need to make the starter (fermented dough – this a live culture of yeast and lactobacilli bacteria resulting from flour and water that enables the bread to rise):
Ingredients:
100 mL distilled water
100 g whole wheat flour
50 mL distilled water x 9
50 g whole wheat flour x 9
Instructions:
Combine 100 g of whole wheat flour and 100 mL of distilled water in a glass canning jar. Mix this mixture with a fork until smooth. Cover mixture with a jay cloth and store jar in a place with a consistent temperature between 25-30 degrees, for 24 hours.
Remove 100 grams from this mixture and place it into a new canning jar. To this jar, add 50 mL of distilled water and 50g of whole wheat flour. Mix this new mixture with a fork until smooth, cover with a jay cloth and again, store the jar at a consistent temperature for 24 hours. Discard excess of the leftover mixture (OR, to minimize waste, you can use this to make pancakes, banana bread, biscuits, chocolate pumpkin loaf, ect. .. you can get creative!)
Repeat this feeding process for the coming days (at least 5). The starter will begin to rise and bubble. Bubbles indicate fermentation, meaning the yeast is developing in your culture which is a good sign, this means that your starter is doing what its supposed to be doing! Side note: if a liquid appears on the top of the starter this is normal, and indicates that your starter needs to be fed. This is called “the hooch”, and has a very foul smell. It is best to discard this by pouring it off.
At around day 10, there should be plenty of bubbles present in your starter, both large and small. If your starter is bubbly, active, fluffy and spongy, it means it is active and ready to make bread!
Now, to shape and bake the sourdough bread (the complicated part):
What you’ll need:
digital kitchen scale
large mixing bowl
a tea towel
plastic wrap
a dutch oven
parchment paper
Ingredients:
230 mL of filtered water
400 grams of all purpose flour (you can experiment with replacing some all purpose flour with whole wheat or rye flour) + flour for spinkling
160 grams of active starter
5 grams of salt
Instructions:
Add 160 grams of your starter to a large mixing bowl, to this add 230mL of filtered water. This is referred to as the “leaven”, and enables the bread to rise.
Using your hand, muddle this mixture to breakup the leaven.
To this mixture add 400 grams of all purpose flour (you can experiment with replacing some all purpose flour with whole wheat or rye flour).
With your hands, while continually turning the bowl, scoop the flour, water and starter mixture into the centre of the bowl, until it is thoroughly combined and all the flour has been incorporated – the dough will be pretty sticky at this point.
Cover this mixture with plastic wrap and allow to rest at room temperature for ~20 minutes.
After resting for 20 minutes, sprinkle 5 grams of salt over the dough. Continue to mix the dough in the same manner as in Step 4, until all the salt is incorporated – you will notice at this point that the dough is not as sticky. Cover the dough with plastic wrap and let sit at room temperature for ~ half an hour.
Mix the dough in the same circular motion, for ~30 seconds. Set the dough aside and let rest for three hours – this is the first rise, known as “bulk fermentation”.
During these 3 hours, every 30 – 45 minutes, “stretch and fold” the dough, this strengthens the dough. To do this, wet your hands, and fold the dough into the centre while turning the bowl. Continue until the dough forms a ball in the centre of the bowl, this is done in place of kneading.
Next, shape the dough. After resting, stretching and folding for 3 hours, gently remove the dough from the mixing bowl using a scraper, onto a floured surface.
To shape the dough, fold all sides into the middle, pulling in the corners, until forming a round shape.
Pick up the dough using a scraper, and flip it over. Use your hands to tuck the dough into a circular shape. Let the dough rest on the counter for 10 minutes.
Pick up the dough and again flip it over. Once more, folding in the sides towards the middle until a round shape is formed. Sprinkle flour over the top of the dough.
Place the dough (seam side up) into a floured proofing basket or a large mixing bowl lined with a tea towel. Cover the bowl with a tea towel and wrap the bowl in a sealed plastic bag. Place it in the fridge to rest for at least 12 hours.
Heat up a dutch oven with the lid on, in the oven for 20 minutes at 450 F.
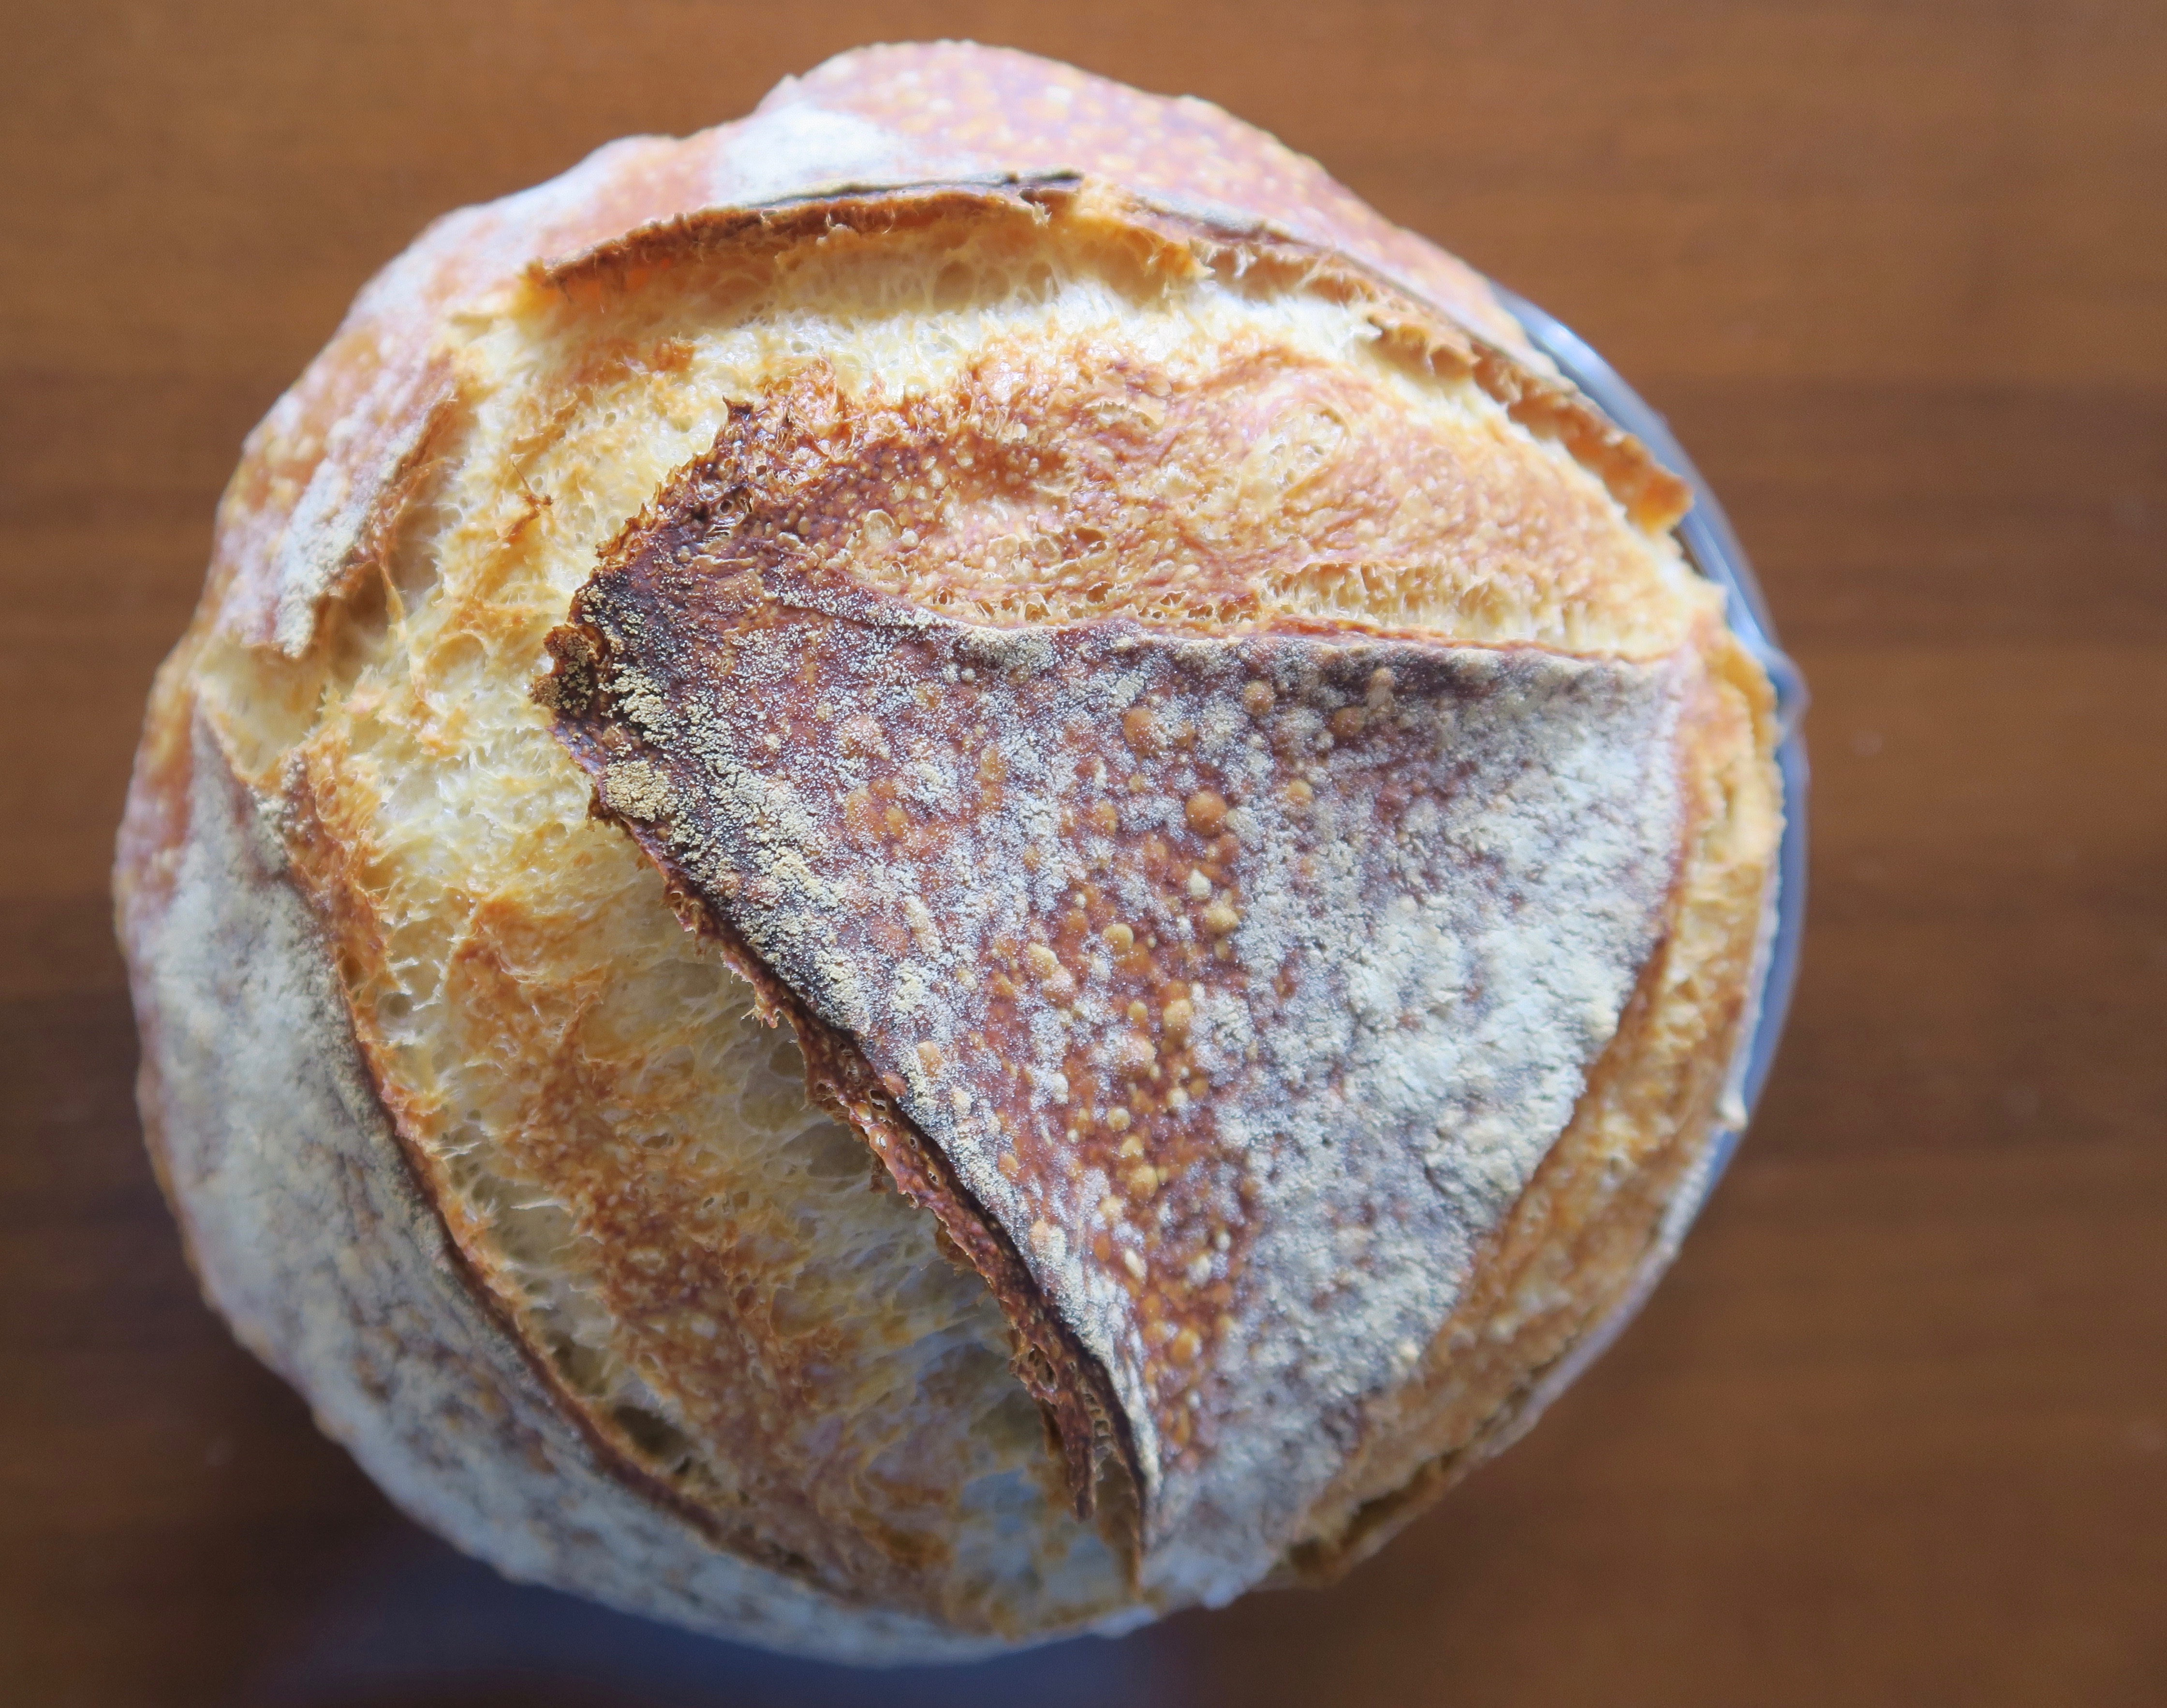
Remove the dough from the fridge and bring it to room temperature. Place a piece of parchment paper over the the basket or bowl and gently flip the dough onto the counter. Score the top of the bread with a sharp knife and immediately transfer the dough into the dutch oven.
Bake the dough at 450 F for 20 minutes with the lid on. Remove the lid and continue to cook for 20 more minutes at 425 F or until the internal temperature is ~200 F.
Transfer the bread out of the dutch oven onto a wire rack to let cool for at least 3 hours.
(Drench the sour dough with butter &) Enjoy!!
I watched this youtube video as a guide to help with the shaping and baking process. It is super helpful! https://www.youtube.com/watch?v=sZP3TKWlGnA.
Special thanks to Dede and Mark for the assistance 😉
Ever since visiting Thailand, I have had many failed attempts at creating fresh vegetable rolls. Two years later and I’m still trying to master it! This batch turned out moderately presentable and is packed with so many different flavours, various vitamins and minerals and most importantly, taste delicious!
Ingredients:
10 rice paper wraps
1 large carrot, peeled and thinly sliced
1 cucumber, peeled and thinly sliced
1/2 large red pepper, very thinly sliced
1/3 cup chopped purple cabbage
1/3 cup daikon, thinly sliced
1 avocado, thinly sliced
2 leaves of romaine lettuce, thinly cut
1/2 mango, thinly sliced
5 sprigs of fresh mint (the tastiest part!) and/or basil and cilantro
Spicy Peanut Dipping Sauce: Best with vermicelli noodles and tofu filler.
1/4 cup peanut butter
1/2 tablespoon hoisin sauce
2 teaspoons soy sauce
1/2 clove garlic, minced
1 teaspoon sriracha sauce (optional depending on your spice tolerance)
1 tablespoon of warm water
garnish with crushed peanuts, and/or red pepper chilli flakes
Nuoc Cham Dipping Sauce: Best with shrimp filler.
6 tbsp water
1 tbsp honey or sugar
1 tbsp rice vinegar
1 tbsp fresh lime juice
2 tbsp fish sauce
1 tsp chilli flakes
1/2 clove garlic, minced
Instructions:
Cook filler and set aside.
Prep vegetables, washing and finely chopping and set aside.
Make one or both dipping sauces, whisking together all ingredients until desired consistency is reached. Set aside.
Soak rice paper wrap in a shallow dish with hot water, until softened (~10 seconds). Transfer wrap onto a damp tea towel.
Place vegetables about 1/2 inch away from the edge of the wrap and top will filler. Carefully roll the wrap, finishing by folding in the left and right edges. This is the hardest part as the wraps easily rip.
Serve with sauce and enjoy!!
These vegetables rolls are best consumed the day they are made.
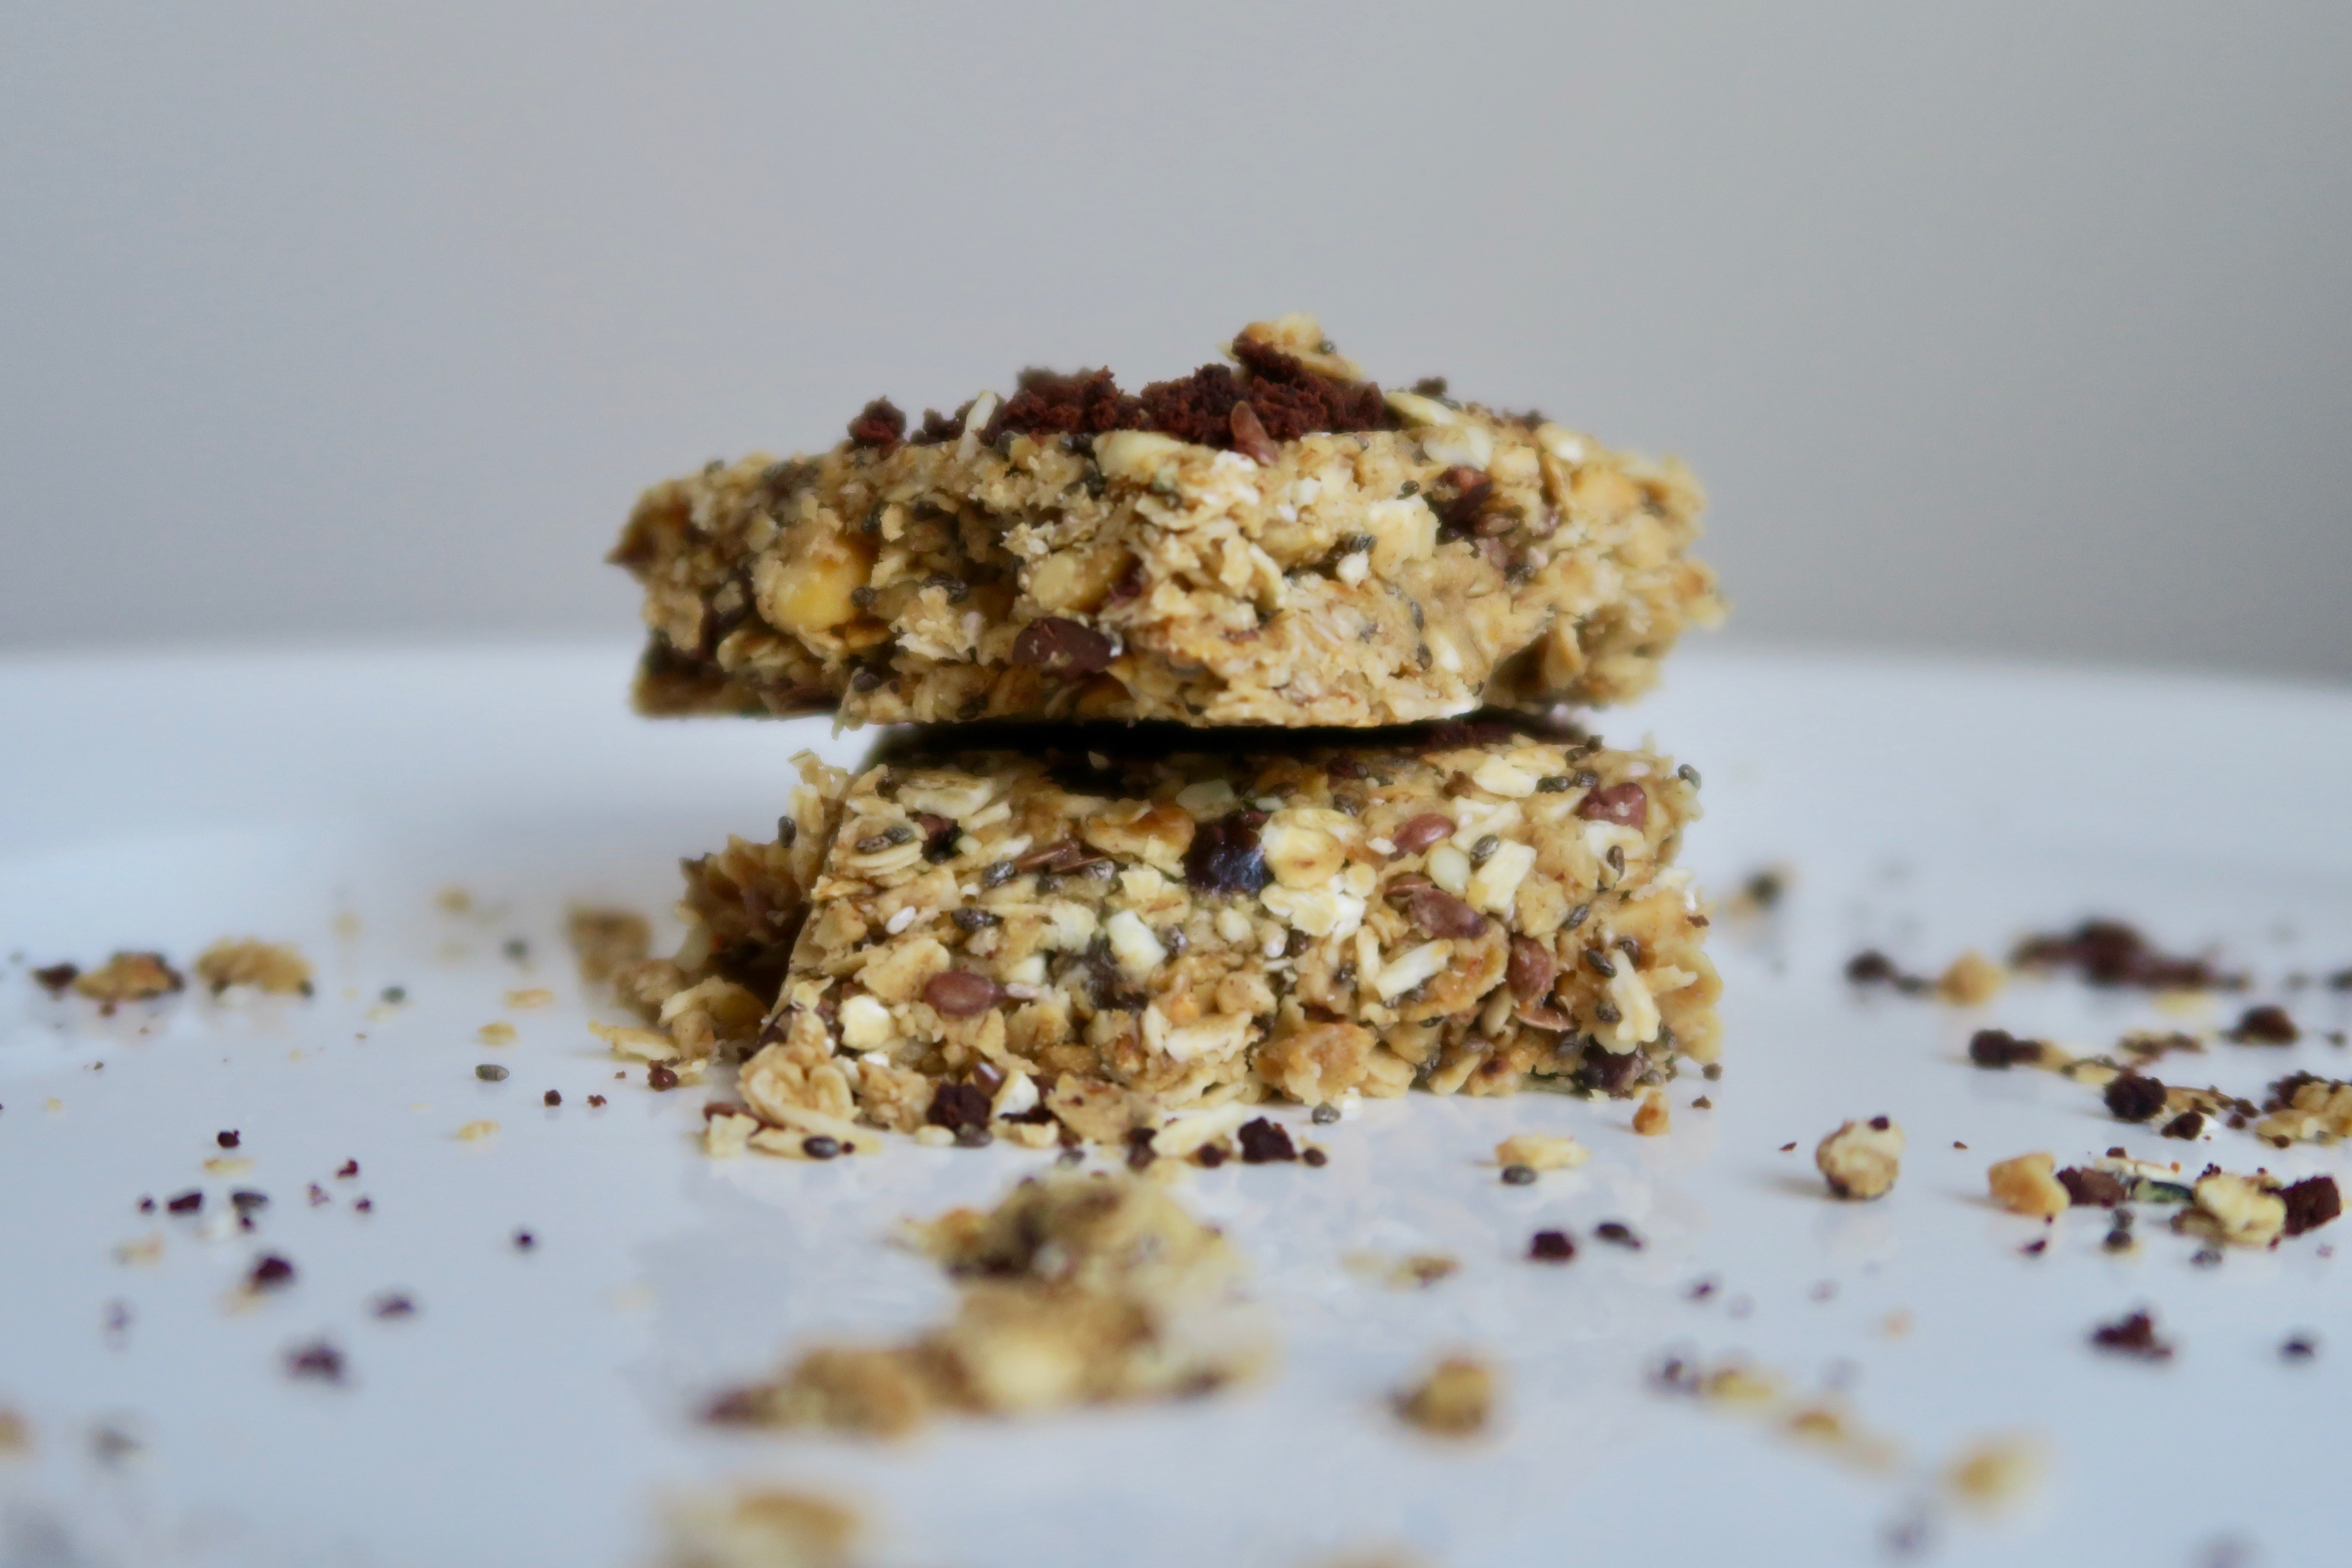
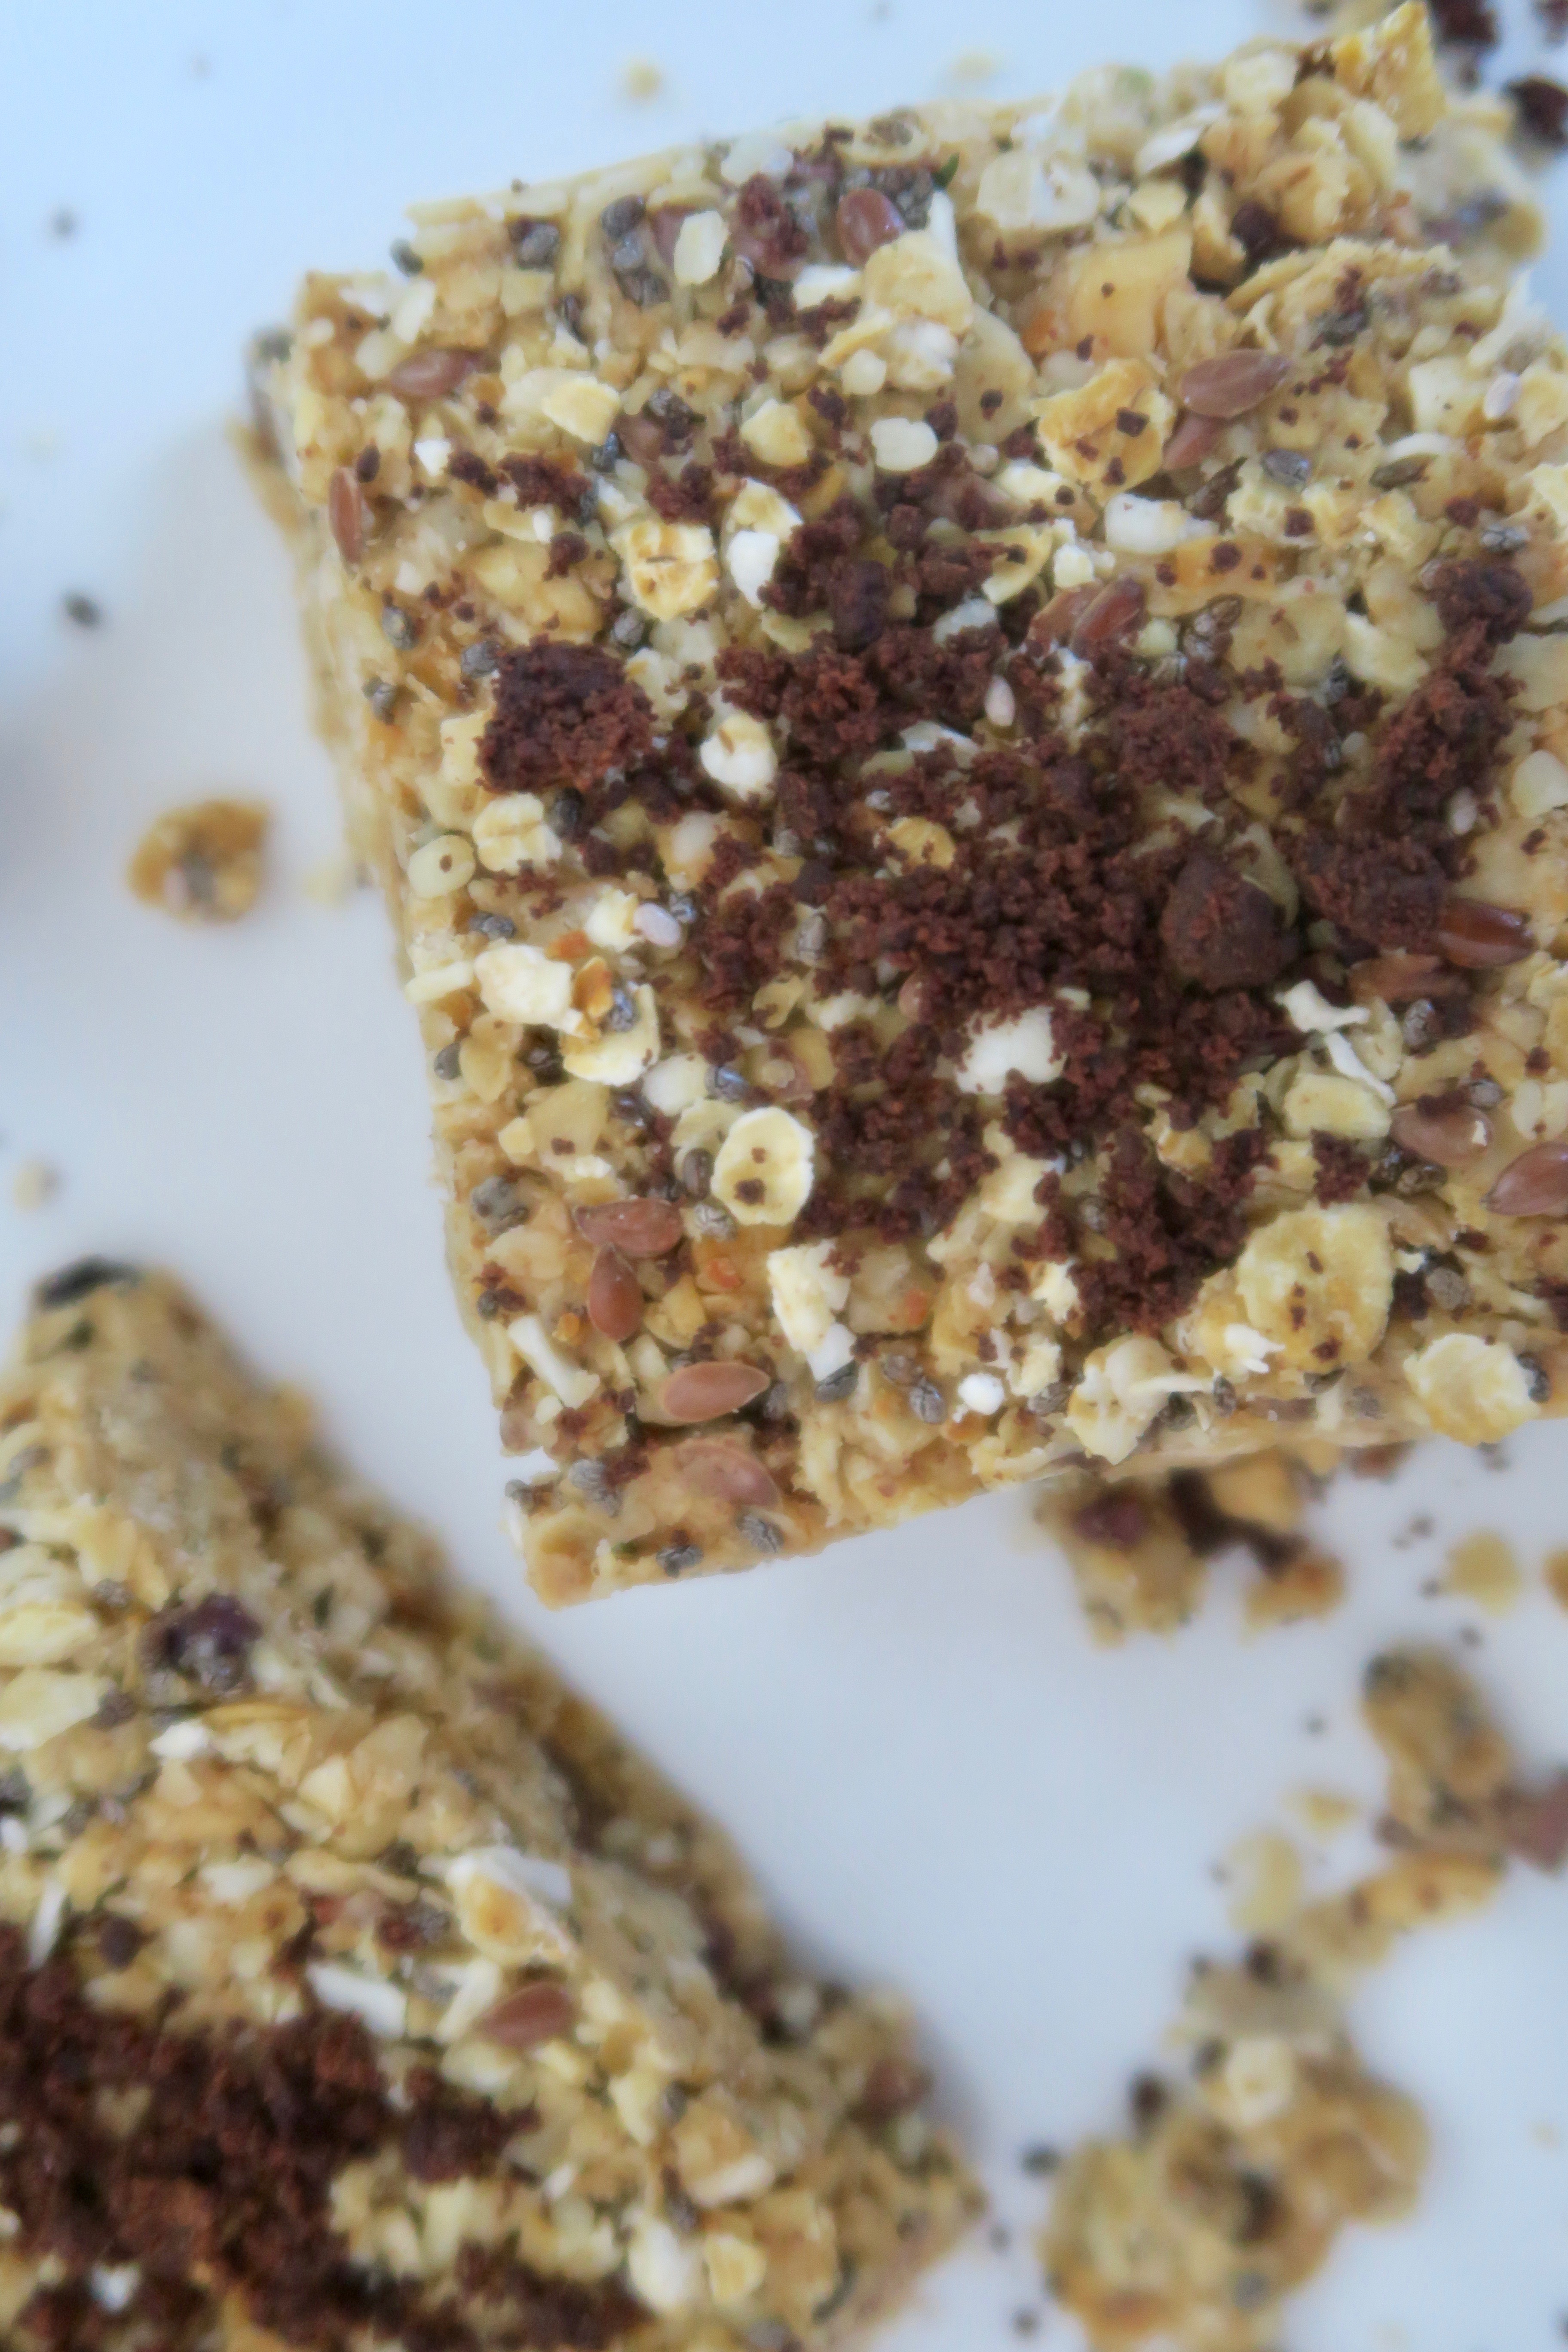
This recipe is simple, quick & healthy, and makes for a perfect afternoon pick me up or snack mid hike!
Ingredients:
2 cups toasted, rolled oats
½ cup of finely chopped dates
¼ cup of shredded, unsweetened coconut flakes
2 tbsp chia seeds
1 tbsp whole flax seeds
¼ cup agave syrup
¾ cup natural peanut butter
1 tbsp hemp hearts
1 tsp pure vanilla extract
2 tbsp cacao nibs
¼ melted dark chocolate chips for drizzle
Instructions:
Toast oats in the oven at 375° F for 10-12 minutes, or until golden brown.
Finely chop dates.
Combine all dry ingredients into a large mixing bowl.
Warm peanut butter and agave nectar in a small pan over low heat. Stir dry ingredients into this mixture. Ensure this mixture is thoroughly combined.
Line a glass baking dish (I used an 8×8- inch dish) with parchment paper and transfer the mixture into the dish.
Firmly press down the mixture with the back of a wooden spoon, until it is evenly spread out. Make sure this mixture is uniformly flattened, and firmly pressed otherwise the squares will easily crumble.
Cover the dish and let granola firm up in the freezer for 20-25 minutes.
Remove granola from dish, and cut into roughly 16 squares. Top the bars with cocoa powder, or drizzle with melted dark chocolate.
Store the squares in a container for up to 4 days or in the freezer for up to 3 months.
These peppermint black bean brownies are a delicious healthy “ish” treat if you’re craving something sweet! This recipe is an easy way to sneak in a couple extra servings of legumes and is p-a-c-k-e-d with fibre. I promise you won’t be able to taste the black beans – I have tricked multiple people into thinking these are regular brownies… Let the Christmas baking begin!!
Ingredients:
1½ cups of black beans (rinsed and drained)
½ cup of rolled oats
1 mashed banana
½ cup of maple syrup
2 tbsp ground flax
2 tbsp melted coconut oil
2 ½ tbsp sugar
½ cup of cocoa powder
½ tsp baking powder
1 tsp vanilla extract
1 tsp peppermint extract
¾ cup of semi-sweet chocolate chips (I did half semi-sweet and half 70% cocoa)
2 crushed candy canes
Instructions:
Preheat oven to 375° F.
Combine all ingredients, except for chocolate chips into a food processor or blender, and blend until a smooth consistency is reached.
Pour batter into a large bowl, add chocolate chips, and stir.
Pour batter into a 8×8-inch greased pan, and evenly spread.
Bake for 30-35 minutes, or until a toothpick inserted into the centre comes out clean.
Once cool, top brownies with crushed candy canes and additional chocolate chips if you desire (just for good measure 😉 ).